


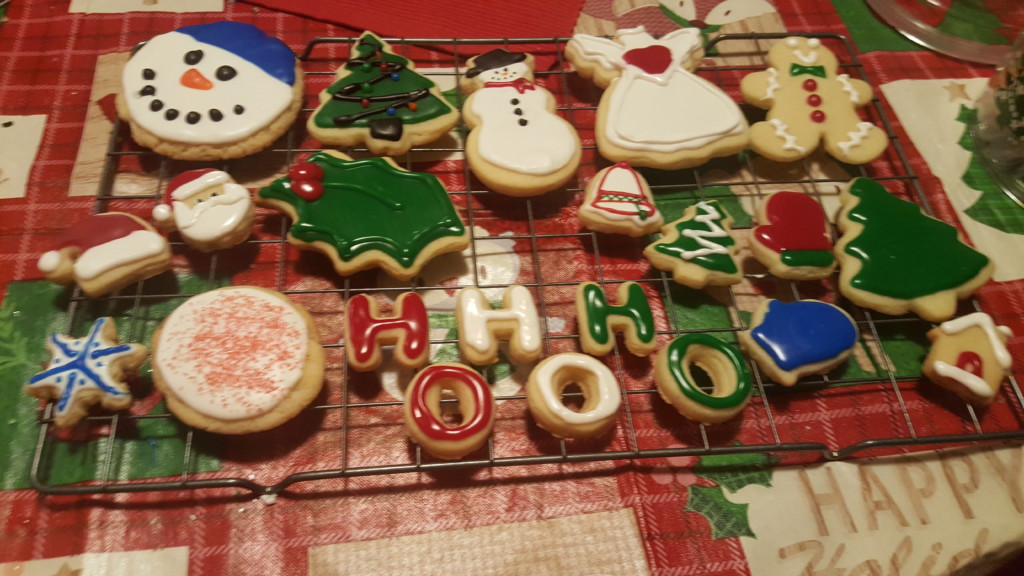
I am always surprised (and very pleased) when complimented for my decorative holiday sugar cookies. I always tell people that they could probably do it too, because it really isn’t as hard as it looks. In this post, I will share with you 12 easy designs that can be enhanced to fit anyone’s skill level.
How I Got Into Decorating Cookies
A couple of years ago, with no cookie decorating experience, I decided to bake and decorate sugar cookies for my daughter’s 3rd birthday party. I also only decided to do this the night before the party, so cluelessly, I sent her father to the supermarket for whatever he could find that was peanut and treenut free. Her theme was Frozen, and I planned on making snowflakes. I went to Google for inspiration on designs. I was shocked by how big of a hit they were, so now I continue to make cookies for birthday parties and holidays.
I’m No Duff Goldman
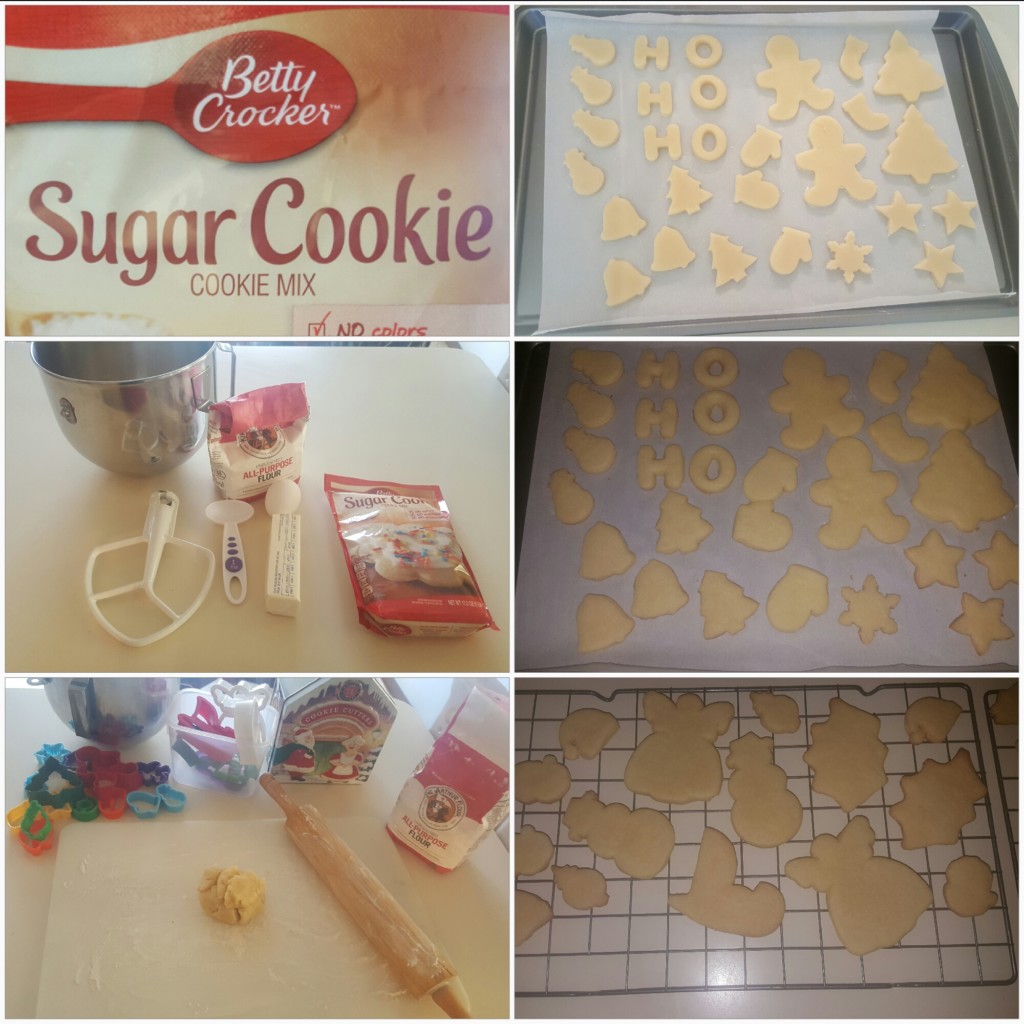
If you are looking for a “from scratch recipe,” you will not find it here. I use Betty Crocker™ cookie mix and it comes out absolutely delicious every time. I generally like to make small cookies because they are bite-size, easy to decorate without flaws, and look amazing in bulk. Even if you prefer to make your sugar cookies from scratch, you may still find these simple designs and my decorating tips very helpful. One of these days, I plan on playing around with different recipes, but for now I am content with just working on my presentation.
What you need:
- Sugar cookie mix (and the ingredients needed, as specified on the packaging of the mix)
- Flour
- Baking sheet
- Parchment paper (optional)
- Rolling pin
- Cookie cutters of your choice.
For the cookies featured in this post you need:
- a mitten
- Santa’s hat
- the letters “H” and “O”
- a small and large Christmas tree
- the Gingerbread Man
- a holly leaf
- a bell
- an angel
- a snowman
- and Santa’s hat
- Cookie icing in colors of your choice
*** COOKIE ICING TIP: Not all icing dries the same, so make sure that the icing you buy or make is for cookies. I generally use Betty Crocker™ since it is stocked in the supermarket, but I have also used Wilton®.
***COOKIE ICING TIP: After every holiday, the supermarkets often have a clearance on their heavily marketed colors for that holiday. It’s a great time to stock up then. I like to make sure I pick up extra since my daughters love to decorate, too. So Valentine’s Day, St. Patrick’s Day, Easter, Halloween, and Christmas are a few big ones I can think of that create a surplus.
- Cooling rack or surface
- Spatula for transferring cookies
- Toothpicks (optional, but they can be very helpful in removing dry icing from the piping tip, and for icing tiny dots or fine lines. You can also use a fork or similar utensils from your kitchen if a toothpick is not available)
- Decorating decor, i.e., colored sugars or sprinkles (optional)
Making Your Cookies – What to Do:
- Prepare your cookie mix
- Dust your rolling surface and your roller with flour
- Gently roll out about a handful of dough
- Cut out your cookies (Make at least one extra of each design to use as a test cookie or plan ahead for errors)
- Transfer them to an ungreased baking sheet (I like to line my baking tray with parchment paper, but that is optional… I also find it easier in transferring cookies after they are baked)
- Bake (They bake very fast and are very soft until cooled… I don’t even like them to brown on the bottom, just golden in color)
- Let your cookies cool for a few minutes before transferring them to a cooling rack or cooling surface. Transferring them too soon will cause them to break.
- Transfer your cookies to a cooling rack or surface and let them cool completely before icing.
1. The Mitten
What to Do:
Make an outline around the mitten in your color of choice and then fill it in while wet.
*** COOKIE ICING TIP: Try not to get too close to the edges of the cookie, or it will drip along the sides.
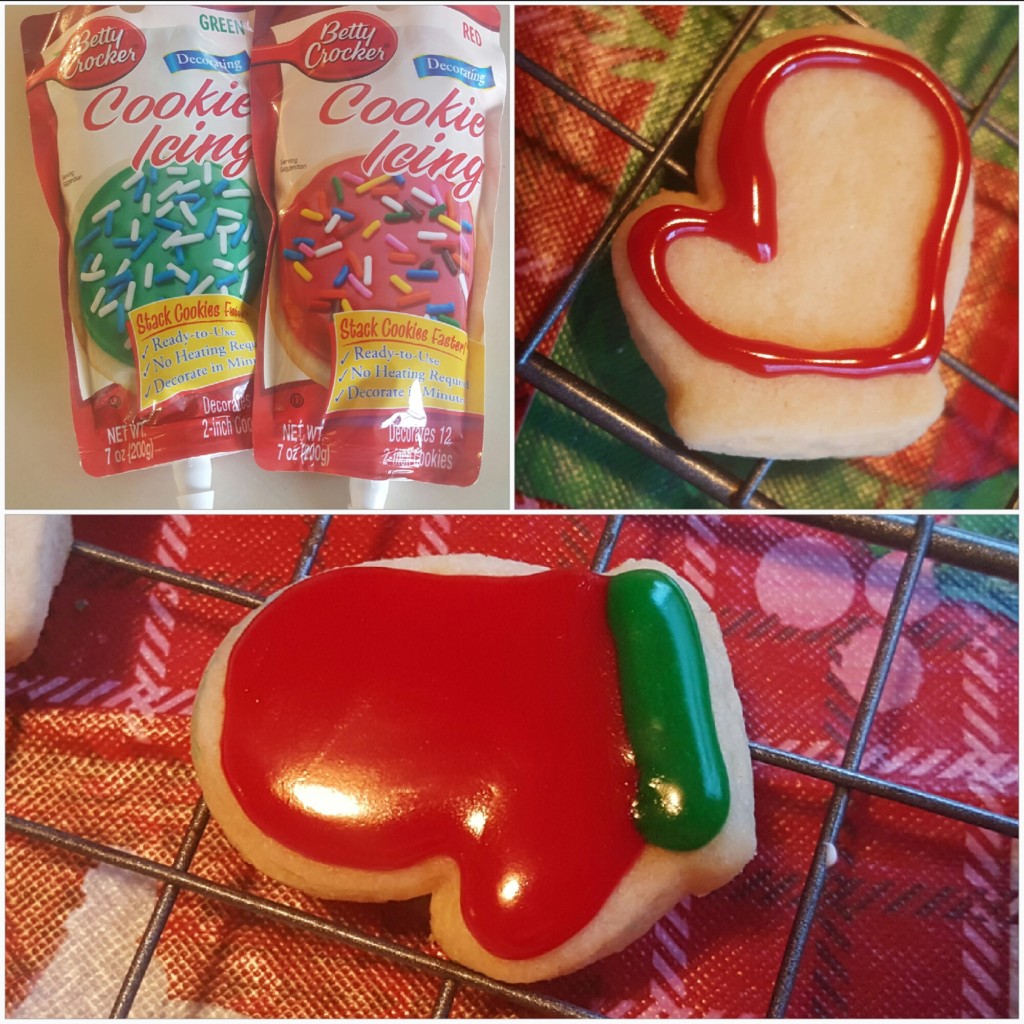

You can also experiment with other designs, like polka dots. Adding polka dots while wet would make the texture uniform, but I would recommend waiting until it dries and adding polka dots for beginners (it still looks great and there is less room for error). You can also add decorating decor like colored sugar or sprinkles while the icing is still wet.
*** COOKIE ICING TIP: If you are cutting off the tip of the cookie icing piping tip, start off small and test its flow. Some icing jobs require more detail and you will need a narrower tip.
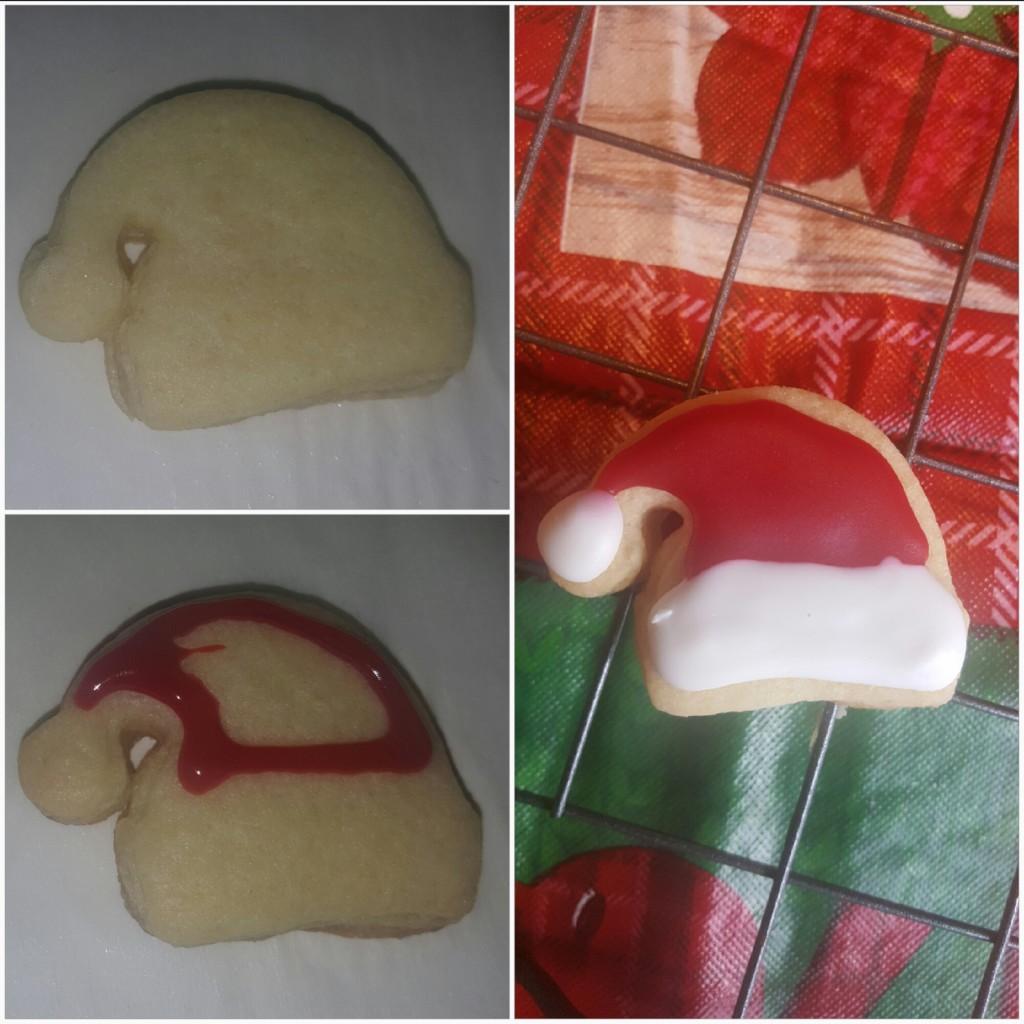
2. Santa’s Hat
What to Do:
This one is pretty similar to the mitten. You will use the same technique.
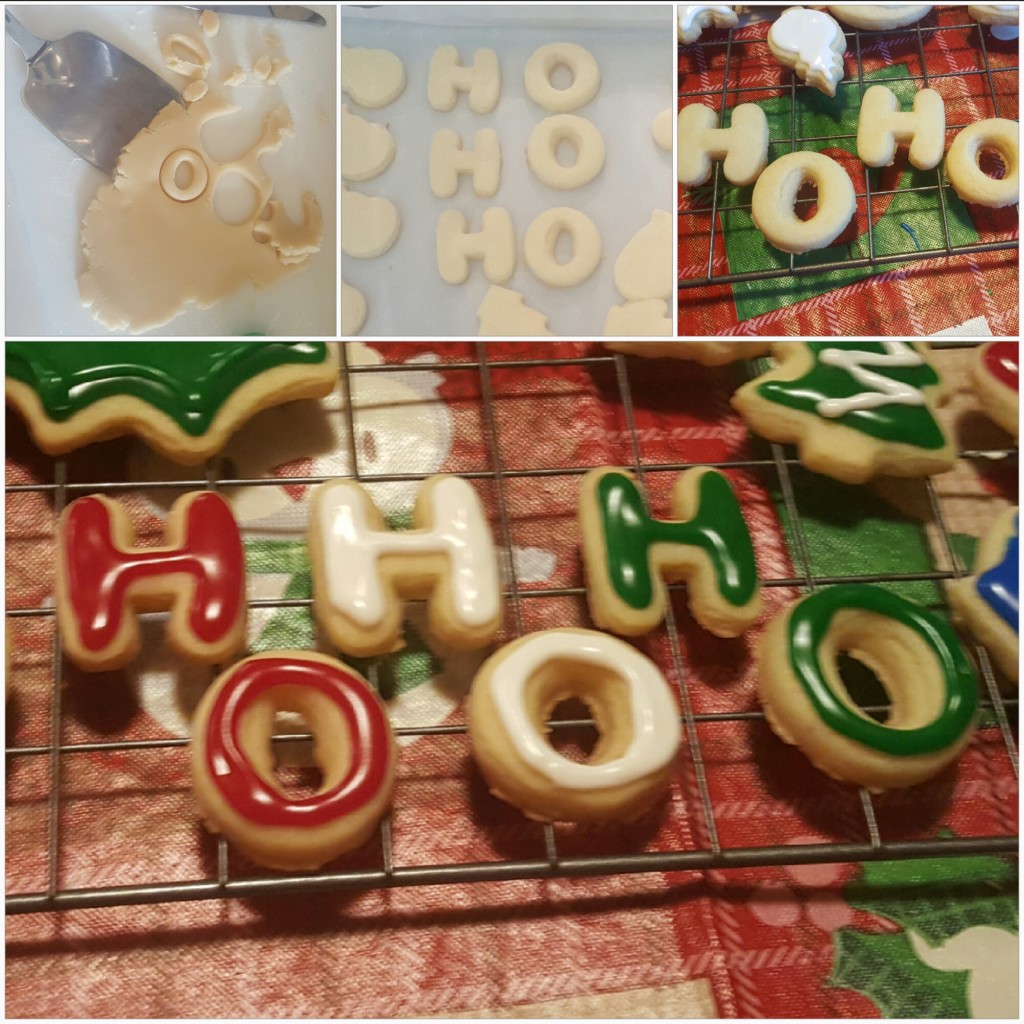
3.”Ho Ho Ho”
What to Do:
The difficulty with this design actually comes prior to baking. Cutting out small letters can be challenging. I especially found this to be true with the letter “O” in getting it out of the cookie cutter and keeping its shape. You can use a toothpick or knife in this case to loosen up the sides. Decorating is very easy, and you can also add designs or glitter sprinkles to spice it up a bit.
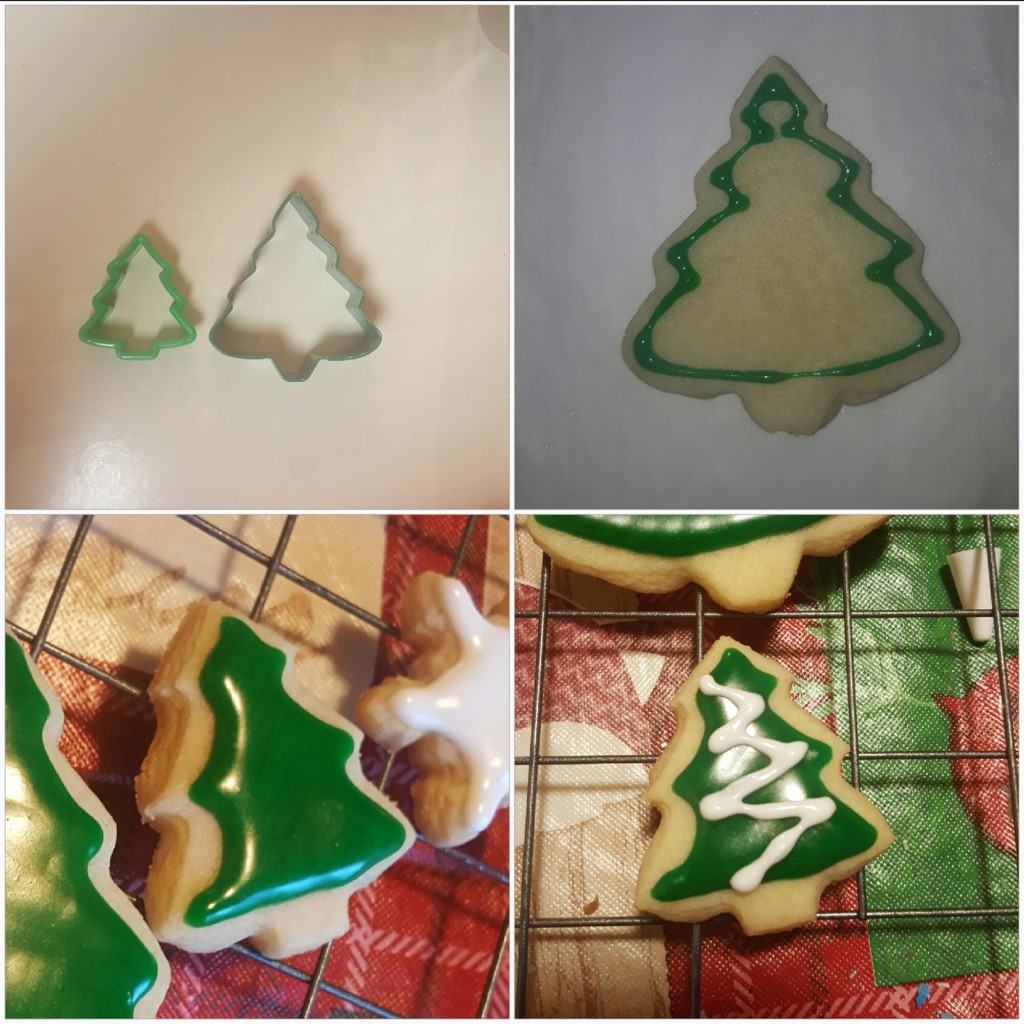
4. Small Tree with Garland
What To Do:
Outline the tree with icing and then fill it in while wet. (See #1. The Mitten for filling in technique). Wait for the green to dry completely before adding the icing for garland.
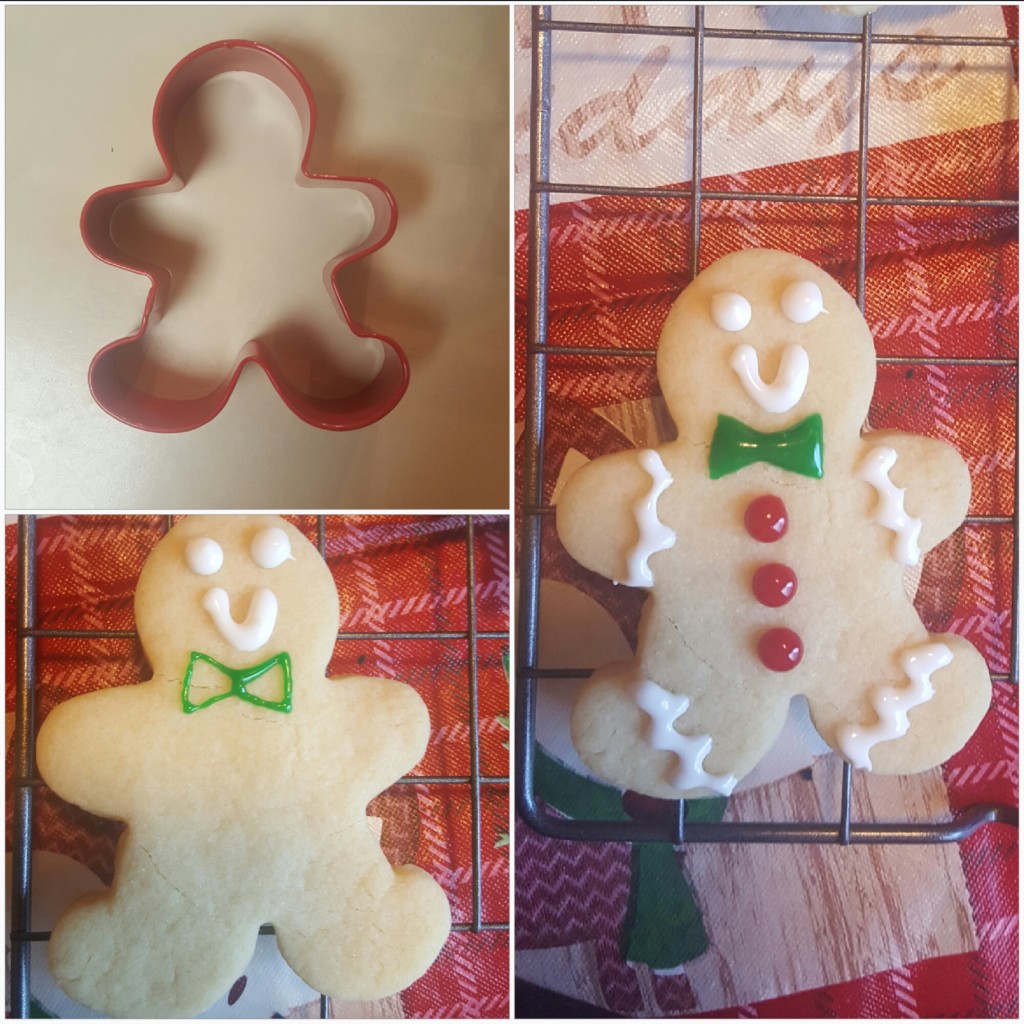
5. Gingerbread Man
What To Do:
Refer to the picture below for this design. To maintain the shape of the bowtie, it would be helpful to draw an outline of the shape and then fill it in. Having a narrow piping tip would be best in this instance.
6. Holly Leaf
What To Do:
Outline the leaf and fill it in while wet (See #1. The Mitten for filling in technique). Let the icing dry completely, before going to the next step. Add the detail on the leaf and allow the icing to dry completely before beginning to add the berries. Each berry must be added individually and dried before adding another to prevent the berries from combining into one large blob of a berry. To make the berries, you can outline the berry and fill it in. This design is simple, but cannot be rushed.

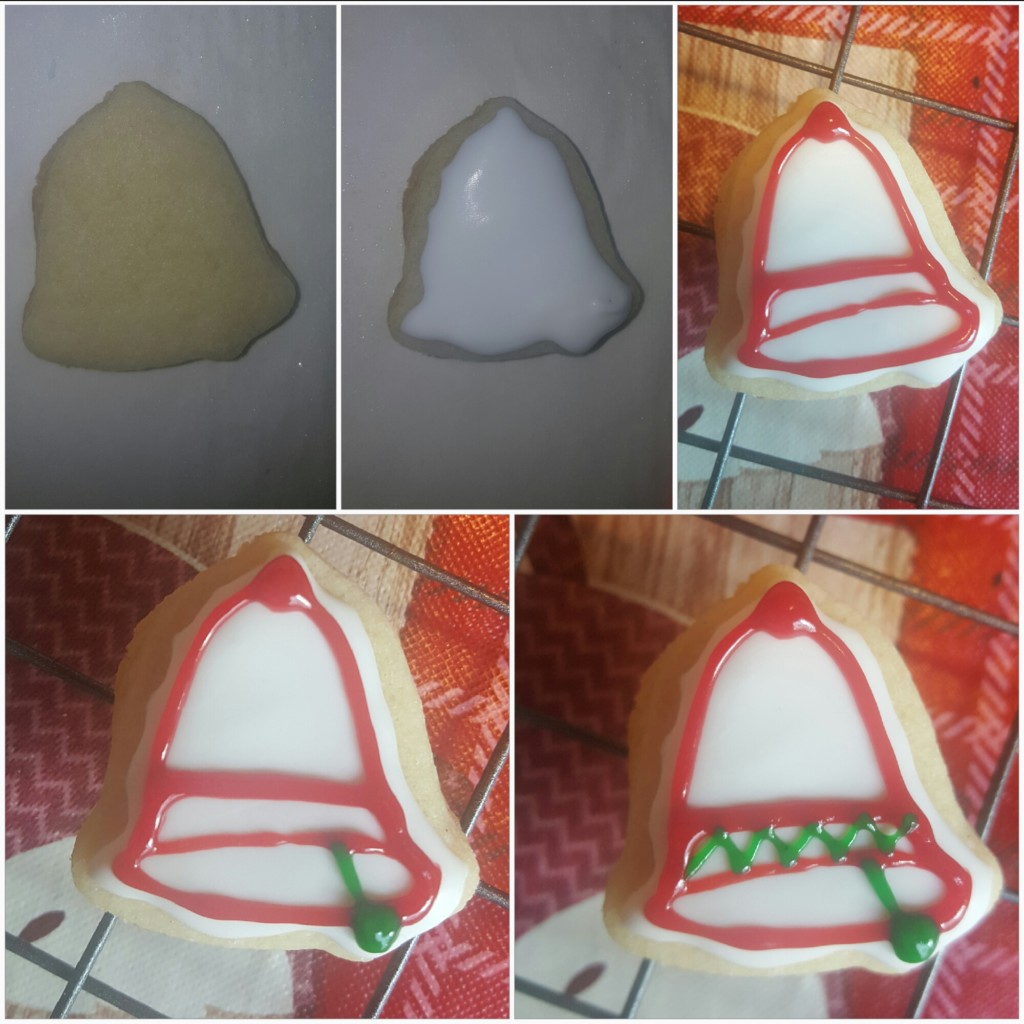
7. The Bell
What To Do:
Outline the bell and fill it in. (See #1. The Mitten for filling in technique). Allow to dry completely. Add the details of the bell in any color of your choice. Wait for each color of icing to dry before adding more details.
*** COOKIE ICING TIP: You can use a wet q-tip or paper towel to wipe away any small errors made. This only works well when the previous layer of icing has completely dried.
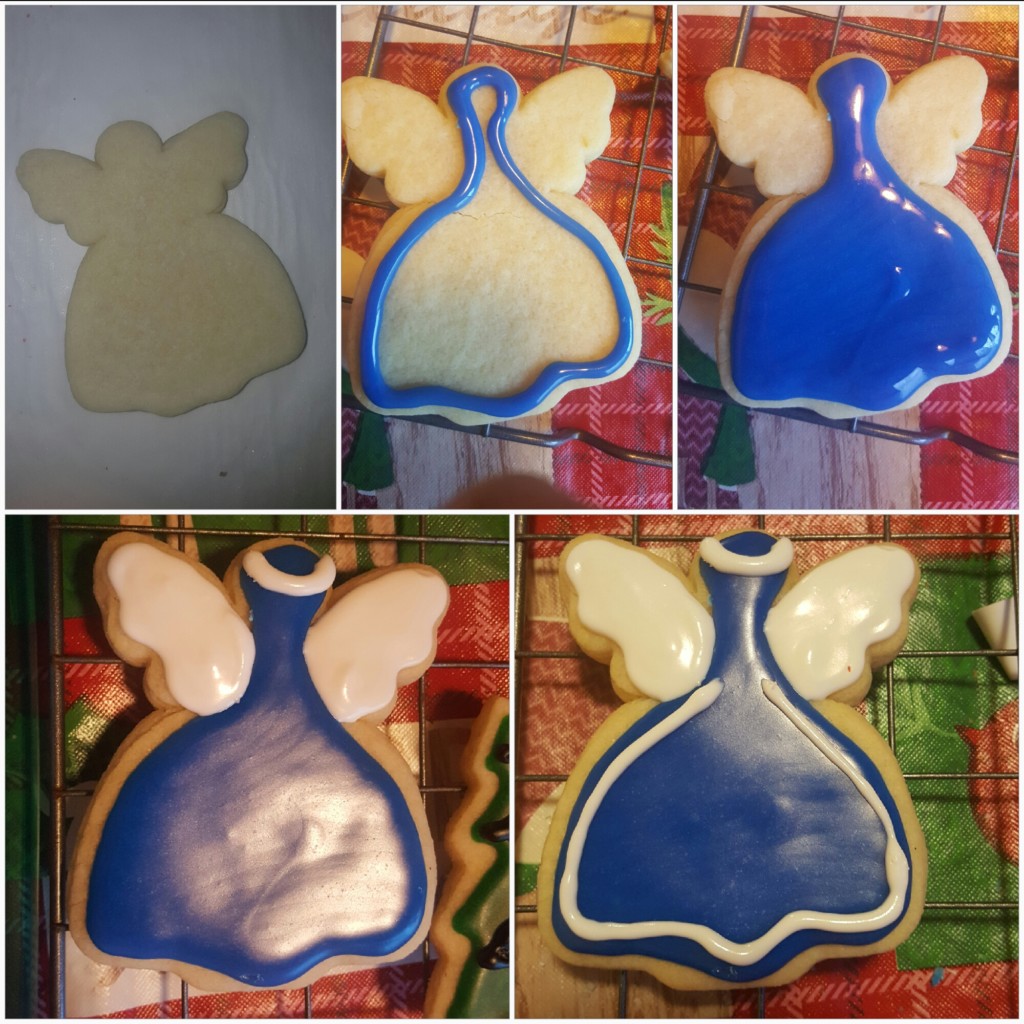
8. The Angel
What To Do:
Outline the angel’s body (except for the wings) and fill it in. (See #1. The Mitten for filling in technique). Allow to dry completely. Outline the wings and fill those in completely. Add the halo and details on the dress.
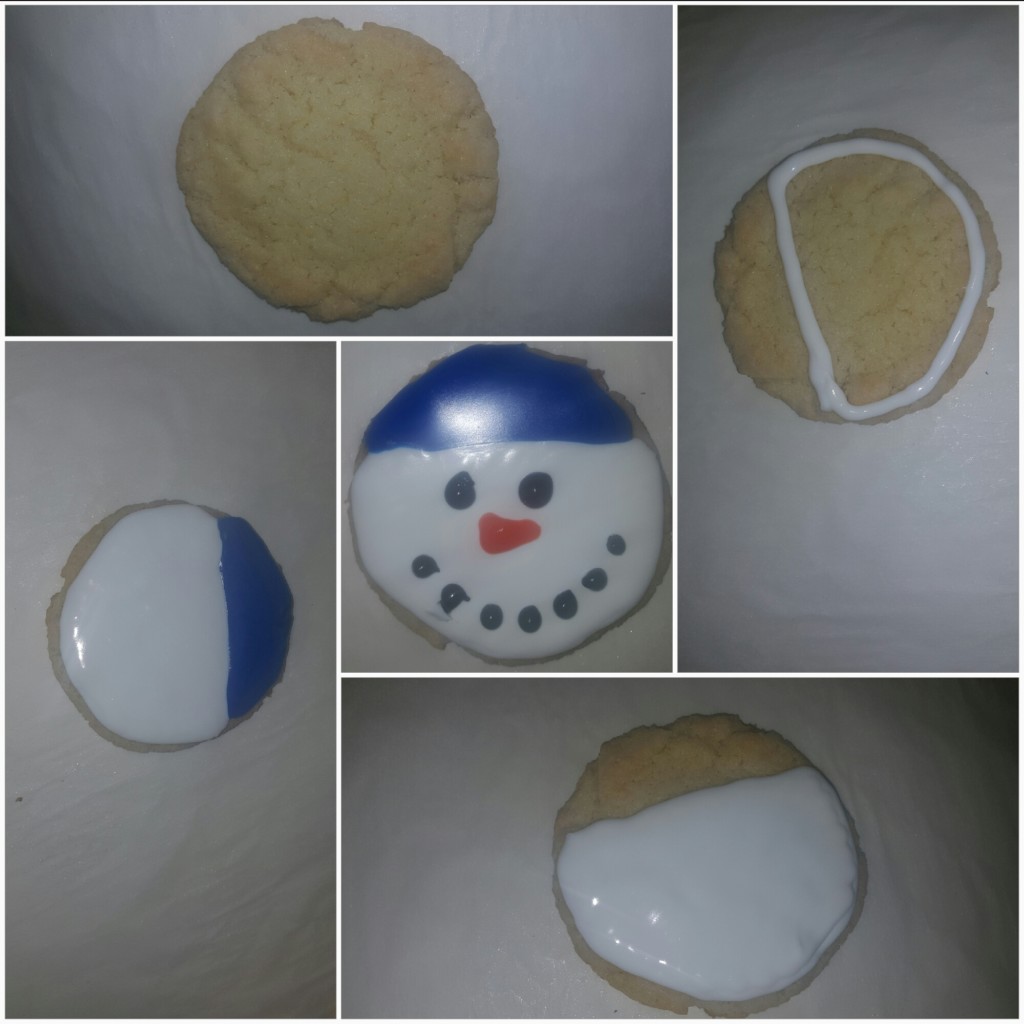
9. The Snowman Head
This cookie was prepared using the drop cookie mix recipe on the cookie mix packaging. However, you can also use a circle cookie cutter or shape the dough into a circle by hand if you are using the cookie cut out recipe.
What To Do:
*** COOKIE ICING TIP: Try not to get too close to the edges of the cookie, or it will drip along the sides.
Outline the face of the snowman and leave the area where the cap will be empty. Fill the face in completely. (See #1. The Mitten for filling in technique). Using a different color, outline the area of the snowman’s cap and fill it in completely. (If adding any colored sugar or sprinkles, add while the icing is still wet. If adding polka dots or other designs to the cap, I would wait until the cap has dried, especially as a novice) Allow to dry completely. Add the details of the eyes, nose, and mouth. You should outline the shape of the nose and then fill it in to create a triangular shape. A narrow piping tip would be most helpful in this instance.
*** COOKIE ICING TIP: Making dots can be tricky. The best thing I can advise is to raise your piping tip straight up after making the dot. There will likely be a string of icing that follows. Use your finger to cut that string of icing off before it detaches on its own and folds over.
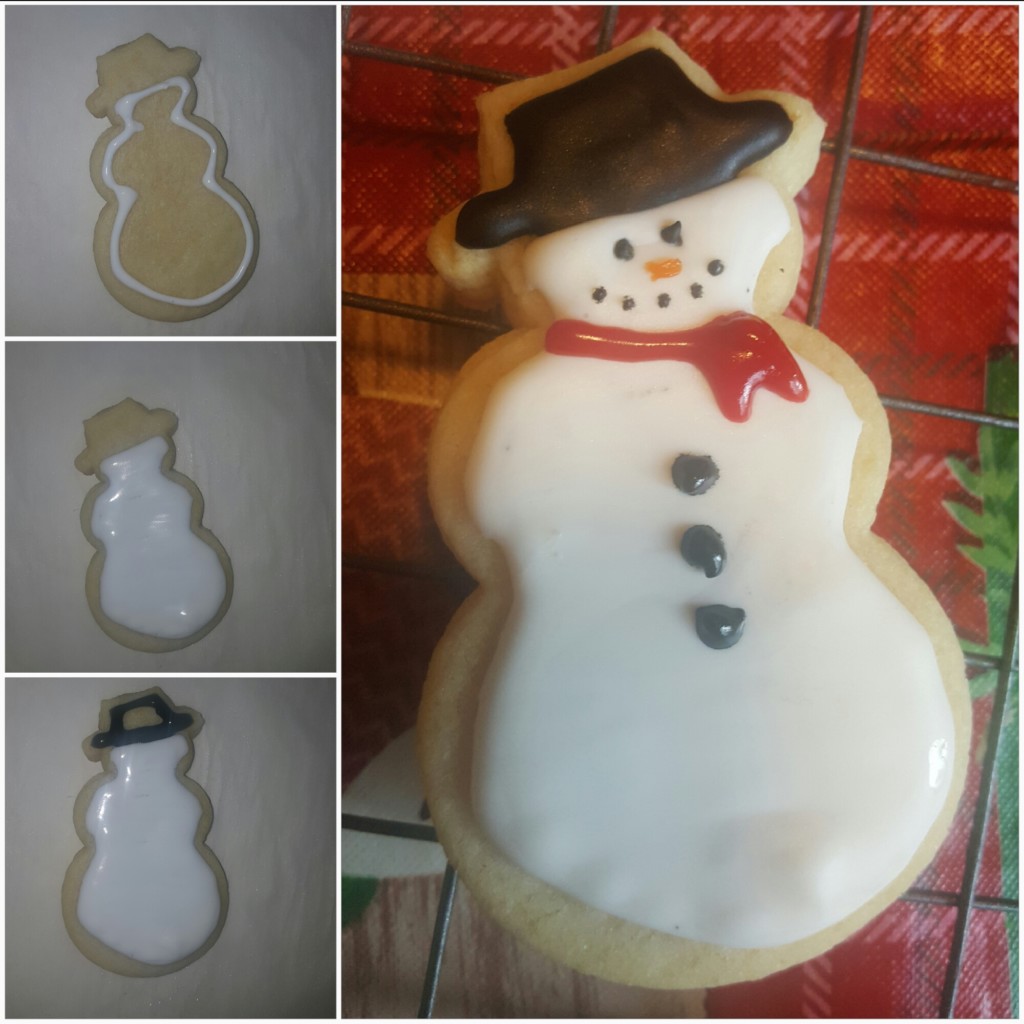
10. The Snowman
What To Do:
Outline the Snowman’s body (excluding the area where his hat will be). Fill his body in completely (See #1. The Mitten for filling in technique). Outline the Snowman’s hat and fill it in. Allow time for the icing to completely dry before adding the details. Unless you have an extremely narrow piping tip, dipping a toothpick in the icing would be best for making the small dots for the eyes and mouth and also for outlining and filling in the nose.
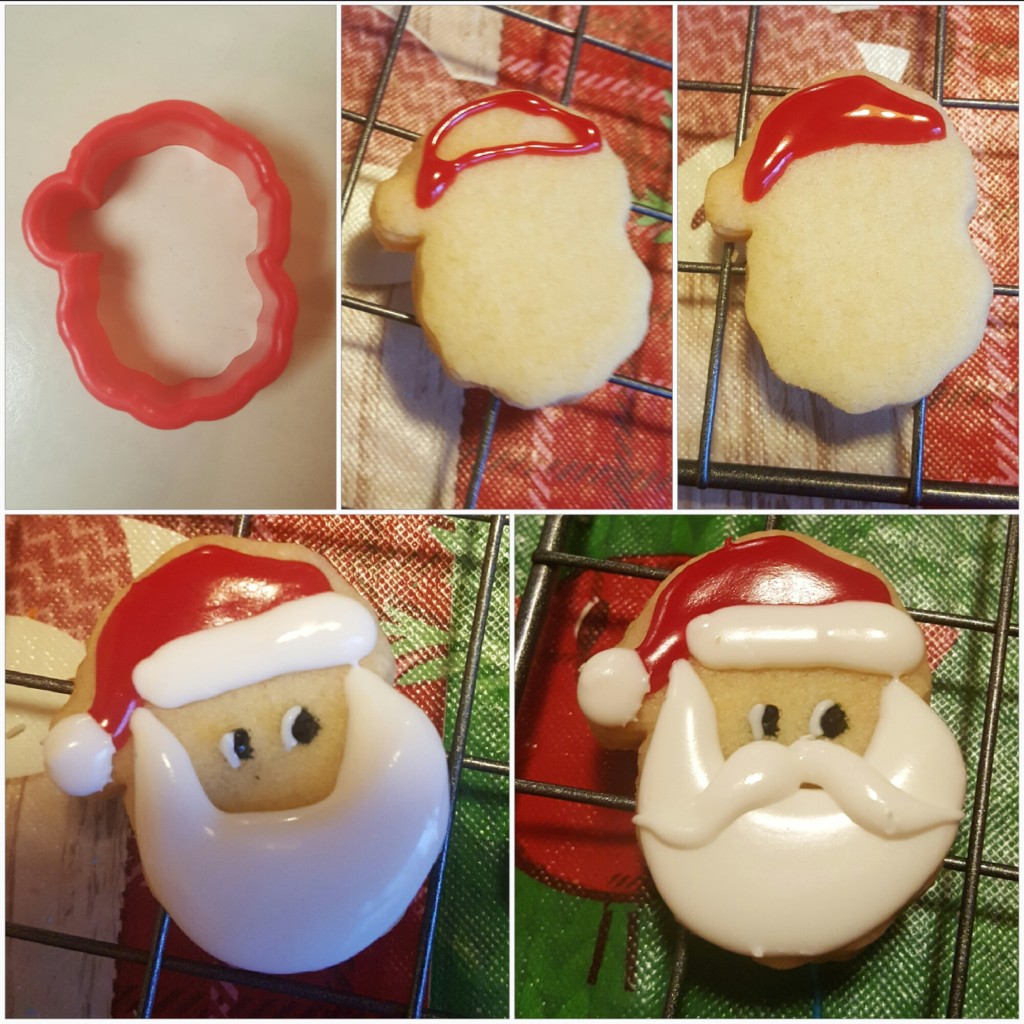
11. Santa’s Head
What To Do:
Outline Santa’s hat and fill it in. Add the brim and pom to the hat in a different color. Outline Santa’s beard and fill it in. Unless you have an extremely narrow piping tip, dipping a toothpick in the icing would be best for making the small dots for the eyes. Allow time for the icing to completely dry before adding the mustache.
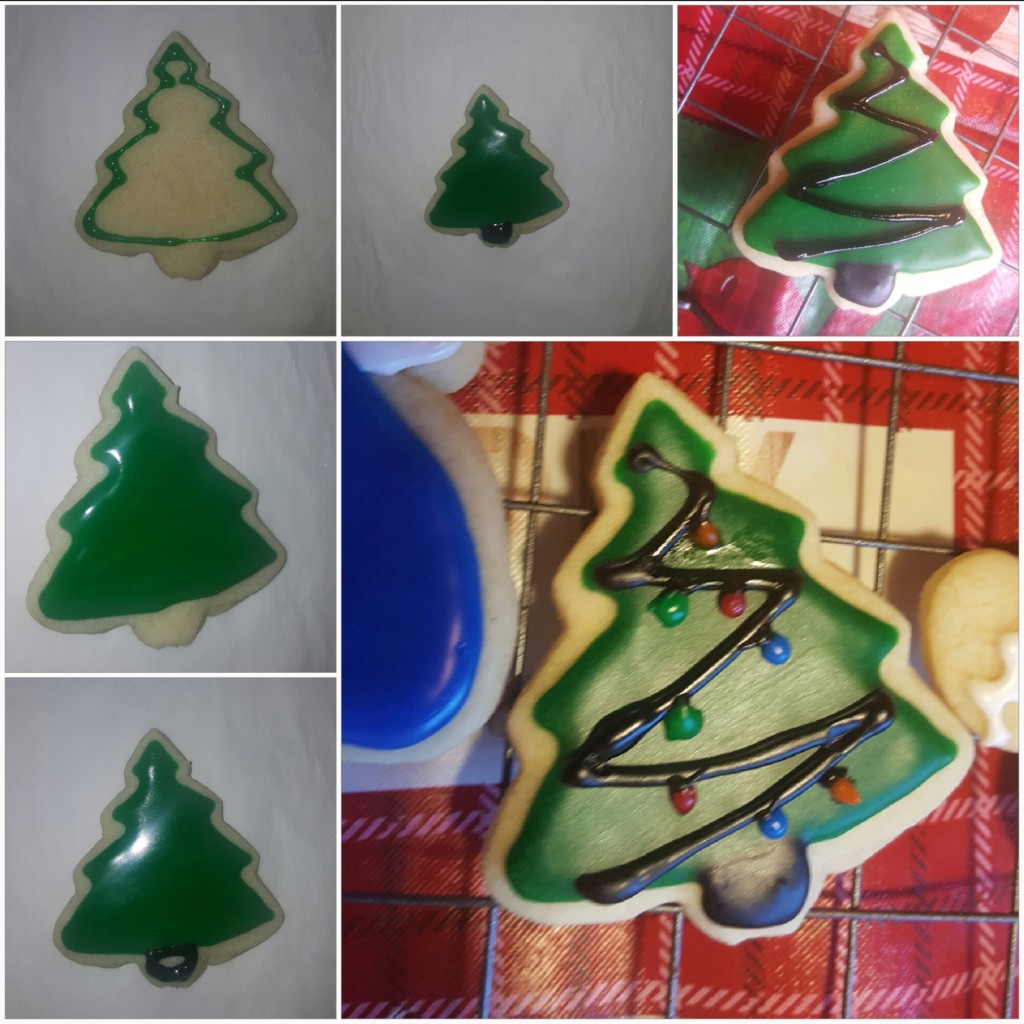
12. Christmas Tree with Garland and Ornaments
What To Do:
Outline the tree with icing and then fill it in while wet. (See #1. The Mitten for filling in technique). Wait for the green to dry completely before adding the icing for garland. Allow the garland dry, and then add small dots along the garland in same color of the garland where the ornament will hang. Unless you have an extremely narrow piping tip, dipping a toothpick in the icing would be best for making the small dots. Allowing these dots to dry before adding the ornaments is optional, but recommended. Using a narrow piping tip would be best.
For more design ideas, you can check out My Cookie Decorating Journey on Pinterest.


 when complimented for my decorative holiday sugar cookies. I always tell people that they could probably do it, too, because it really isn't as hard as it looks.)